Icy Strait Point offers exceptional photography opportunities for Alaska cruise passengers, featuring the world’s largest ZipRider, whale watching, bear viewing at Pack Creek, historic Hoonah cannery buildings, totem poles, and stunning mountain and ocean vistas. The port provides authentic Tlingit cultural experiences and wildlife encounters in a preserved natural setting with fewer crowds than typical cruise destinations.
Quick Facts
| Category | Details |
|---|---|
| Best Photography Times | Early morning (6-9 AM) and late afternoon (4-7 PM) |
| Whale Activity Peak | May through September |
| Typical Port Time | 6-8 hours |
| Weather Considerations | Pack rain gear; overcast skies are common and create great diffused light |
| Wildlife Likelihood | Very high for eagles, bears, and whales |
| Crowd Level | Low to moderate (only 2-3 ships dock here weekly) |
Want to know more about Alaska cruise ports and planning your photography expedition across multiple stops?
Camera Settings for Alaska’s Unique Light
Alaska’s light behaves differently than what most photographers expect. The northern latitude means the sun stays lower on the horizon, creating longer periods of golden hour light. But here’s what the guidebooks don’t tell you: overcast days at Icy Strait Point are actually your friend.
Those gray skies act like a massive softbox, eliminating harsh shadows and giving you gorgeously even lighting for wildlife and landscape shots. Your camera’s auto white balance will probably add too much blue to compensate for the cool light, so switch to cloudy or shade preset, or better yet, shoot in RAW so you can adjust later.
Recommended Settings by Subject
- Whale photography: Shutter speed 1/1000th or faster, continuous autofocus mode, ISO 400-800 depending on light
- Bears on shore: 1/500th minimum, aperture f/5.6-f/8 for sharpness, back-button focus to track movement
- Totem poles and cultural details: f/8-f/11 for depth of field, ISO 100-200, tripod if you brought one
- Landscape vistas: f/11-f/16, lowest ISO possible, use exposure bracketing for dramatic skies
- Eagles in trees: 1/500th to freeze feather detail, spot metering to avoid underexposure from bright backgrounds
Best Photography Locations at the Port
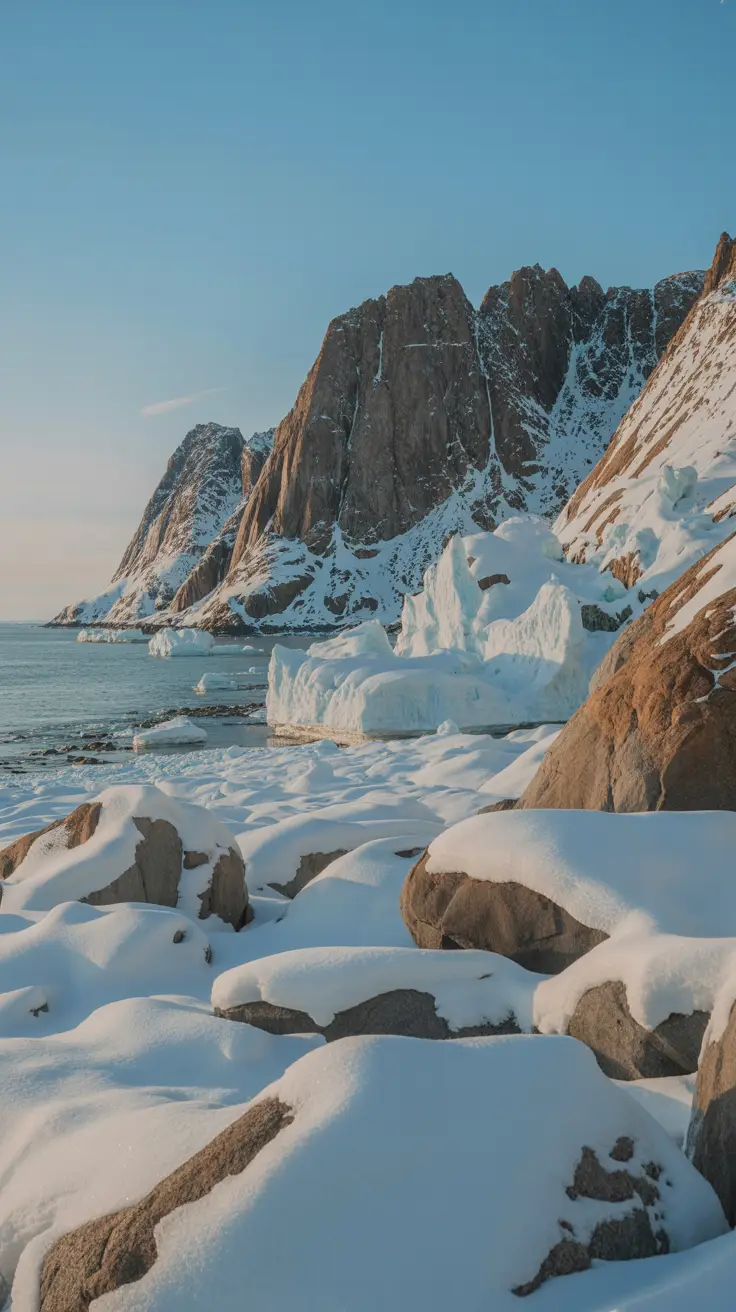
The cannery complex is where most passengers congregate, but the real magic happens if you walk past the gift shops toward the rocky beach area. This stretch gives you unobstructed views across Icy Strait with the Fairweather Range mountains in the background. The tideline often reveals kelp, starfish, and other foreground elements that add depth to your compositions.
The cultural heritage center near the ZipRider launch platform has beautifully maintained totem poles. Most people photograph them at midday with harsh overhead light, washing out the carved details. Come back around 3-5 PM when the sun angle is lower and side-lighting brings out the texture and shadows in the carvings.
For wildlife at Icy Strait Point, head to the dock pilings where bald eagles perch between fishing attempts. They’re surprisingly tolerant of photographers at 50-75 feet away. A 200-300mm lens gets you frame-filling shots without disturbing them.
Wildlife Photography Strategy
Here’s something nobody tells you: the whales don’t care about your ship’s schedule. They surface when they want to, usually in patterns that take 8-12 minutes between breaths. If you’re on shore watching for whales, scan the water for their blow spouts first, then aim your camera at that general area and wait. Chasing after every splash is how you miss the good shots.
For comprehensive tips on capturing Alaska’s wildlife, check out this detailed Alaska wildlife photography guide that covers techniques for various species and conditions.
Brown bears are frequently visible from shore excursions and occasionally from the port area itself. The key is using a long lens (300mm minimum) so you maintain safe distance while still getting compelling images. Set your camera to continuous shooting mode because bears move unpredictably, and you’ll want multiple frames to choose from.
What to Bring
- Telephoto zoom lens (100-400mm or 70-300mm range ideal)
- Weather-sealed camera body or rain cover (even if forecast looks clear)
- Extra batteries (cold weather drains them faster than you’d expect)
- Microfiber cloths for lens moisture and sea spray
- Polarizing filter to cut glare from water and enhance sky contrast
- Camera strap that can convert to neck or shoulder carry
- Small dry bag for gear if you’re going on water-based excursions
The Excursion Dilemma
Icy Strait Point offers fantastic shore excursions, but here’s the photographer’s paradox: group tours move on a fixed schedule that rarely aligns with optimal photo timing. The bear viewing excursions are spectacular, but you’re often shooting through boat windows or from designated platforms with limited angles.
The ZipRider is thrilling and offers aerial views, but you can’t bring professional camera gear on the ride itself. GoPros and secure phone mounts work, though the speed and vibration make sharp images challenging.
A balanced approach: book a morning excursion, then reserve at least 90 minutes of free time in the afternoon to photograph the port area at your own pace. The commercial excursions get you access to otherwise restricted areas, while independent exploration lets you work the light and composition on your own terms.
Weather and Light Challenges
Rain happens frequently, and mist can roll in within minutes. This isn’t necessarily bad for photography. Moody, atmospheric conditions often produce more interesting images than flat blue skies. Just protect your gear with rain covers or even a gallon-size ziplock bag with a hole cut for the lens.
The real challenge is dramatic exposure variance. A whale breaching against a bright overcast sky can fool your camera’s meter into underexposing by 1-2 stops. Use exposure compensation to dial in +1 or +1.3 when shooting dark subjects against bright backgrounds. Review your images and adjust as needed.
Cultural Photography Etiquette
The Huna Totem Corporation owns and operates Icy Strait Point, and the Tlingit cultural elements throughout the port are living heritage, not museum pieces. Always ask permission before photographing dancers in traditional regalia, even during public performances. Most are happy to pose after their demonstrations, and you’ll get better portraits with their cooperation than stealing candid shots.
The interior of the cultural center has artifacts and displays that make compelling photographs, but flash photography can damage certain materials and is often prohibited. Bump your ISO to 1600-3200 and use a wide aperture rather than forcing flash.
Bonus Tips
- The ship’s wake as you depart creates beautiful patterns when photographed from the stern deck. Use a polarizer and 1/125th shutter speed for silky water texture.
- Cruise ship photographers often miss the dock workers and operational details that add authentic storytelling elements to your collection.
- Download offline maps of the port area to your phone before disembarking. Cell service can be spotty and you’ll waste time wandering if you’re trying to find specific locations.
- The gift shops have surprisingly good local art that makes excellent detail shots. Shop owners usually don’t mind if you ask first.
- Bring hand warmers. Your fingers will thank you when you’re waiting for wildlife in 55-degree temperatures with 20 mph winds.
- Time-lapse mode on your camera captures amazing cloud movement across the mountains. Set up on a stable surface, shoot in intervals of 3-5 seconds for 10-15 minutes.
- The restaurant’s outdoor deck offers elevated views perfect for environmental portraits with mountains in background. Buy a coffee and you’ve earned your shooting position.
- Whale fluke patterns are unique to each individual. If you capture a clear tail shot, you can potentially identify your whale through Happywhale database later.
Memory Card Strategy
This sounds paranoid until it happens to you: bring at least two memory cards and swap them halfway through your port day. If one fails or gets lost, you haven’t lost everything. Better yet, if your camera has dual card slots, set it to write simultaneously to both cards.
You’ll shoot more images than you expect. Wildlife photography means burst mode sequences where you might take 50 shots to get 3 keepers. Budget at least 16GB of storage per port day, more if shooting RAW format.
The Golden Hour Advantage
Most passengers stay on the ship until 8 or 9 AM, then rush back aboard by 5 PM for dinner. If your ship docks early, be among the first off. The morning light between 6:30-8 AM is magical, and you’ll have locations virtually to yourself. Similarly, skip the early dinner seating and shoot until the last tender back to the ship. Those extra 30-45 minutes often deliver the best light and most dramatic conditions of the day.
Post-Processing Considerations
Alaska’s atmospheric haze often adds a blue-gray cast to distant mountains. A slight dehaze adjustment in Lightroom or similar software brings back contrast and color without looking over-processed. Don’t go heavy on saturation; Alaska’s natural palette is subtle and sophisticated.
When editing whale shots, resist the urge to brighten shadows excessively. A little mystery in the darker water areas keeps the eye focused on the whale itself.
Common Questions and FAQ
Can I bring a drone to Icy Strait Point?
Drones are prohibited at Icy Strait Point due to wildlife protection regulations and safety concerns with the ZipRider operation. Don’t pack it; you won’t be allowed to fly it.
What’s the best lens if I can only bring one?
A 24-200mm or 28-300mm superzoom gives you the most flexibility. You sacrifice some image quality compared to prime lenses, but the convenience of not changing lenses in rain and wind is worth it.
Will I see bears from the port area itself?
Occasionally bears wander the shoreline visible from port, but it’s not guaranteed. For reliable bear photography, book the Pack Creek excursion or coastal bear viewing tour.
How do I photograph through boat windows without reflections?
Press your lens hood flush against the glass and use your free hand to block light from behind. Shoot at a slight angle rather than perpendicular to the window. A rubber lens hood works better than plastic for this technique.
Are there places to charge camera batteries at the port?
The restaurants and gift shops have limited outlet access, but don’t count on it. Bring fully charged backup batteries instead of relying on finding power.
Should I shoot JPEG or RAW?
RAW gives you vastly more flexibility for recovering details in highlights and shadows, which matters enormously with Alaska’s challenging light. The files are larger, but the editing latitude is worth it.
Personal Experience
When our cruise ship docked at Icy Strait Point, I grabbed my camera and headed straight for the beach area near the cannery. The lighting there in the early morning was absolutely perfect – that soft, diffused glow made the mountains across the strait look almost dreamlike. I kept my ISO around 400 and used a faster shutter speed because I’d heard whales were active that week. Sure enough, about twenty minutes in, a humpback breached maybe 200 yards out. My heart was racing, but I managed to get several shots at 1/1000th of a second that actually turned out sharp.
The cultural center near the zipline entrance ended up being another fantastic spot that I almost missed. The totem poles there have incredible detail, and around midday when the sun was higher, the carved faces really stood out with beautiful contrast. I switched to aperture priority mode and shot at f/8 to keep everything crisp. A local dancer in traditional regalia was performing, and she was kind enough to pause for photos afterward. My advice? Don’t spend your entire port time on an excursion. Leave at least an hour to just wander with your camera. The bald eagles perched on the dock pilings alone are worth it, and they’re surprisingly unbothered by people if you use a decent zoom lens and give them space.