Alaska glacier photography from cruise ships offers stunning opportunities to capture massive ice formations, blue-hued crevasses, and dramatic calving events. Key locations include Glacier Bay, Hubbard Glacier, and Tracy Arm Fjord. Essential tips include using polarizing filters, fast shutter speeds for action shots, and shooting during golden hours for optimal lighting and reduced glare on ice surfaces.
Quick Facts: Alaska Glacier Photography
| Factor | Recommendation |
|---|---|
| Best Camera Settings | Aperture f/8-f/11, ISO 200-400, Shutter 1/500+ |
| Essential Gear | Telephoto lens (70-200mm or longer), polarizing filter, lens cloth |
| Exposure Compensation | +0.7 to +1.5 stops to avoid gray ice |
| Optimal Deck Position | Mid-ship for stability, outer decks for unobstructed views |
| Prime Shooting Times | Early morning (6-9 AM) and late afternoon (4-7 PM) |
Want to know more about Alaska wildlife viewing opportunities during your cruise?
Understanding Alaska’s Glacier Destinations
Not all glacier stops are created equal, and knowing what to expect at each location helps you prepare your photography strategy. Glacier Bay National Park offers multiple tidewater glaciers in one day, with park rangers providing commentary that can help you anticipate glacier calving moments. Hubbard Glacier sits at the head of a long fjord, giving you extended shooting time as the ship approaches and departs. Tracy Arm Fjord combines glacier photography with dramatic fjord walls and icebergs floating in impossibly blue water.
The distance factor matters more than most photographers realize. Some tidewater glaciers allow ships to approach within half a mile, while others require maintaining greater distances. A 200mm lens works for closer encounters, but 300mm or longer becomes necessary for distant glaciers. Cruise lines typically announce viewing distances in advance.
Camera Settings That Actually Work
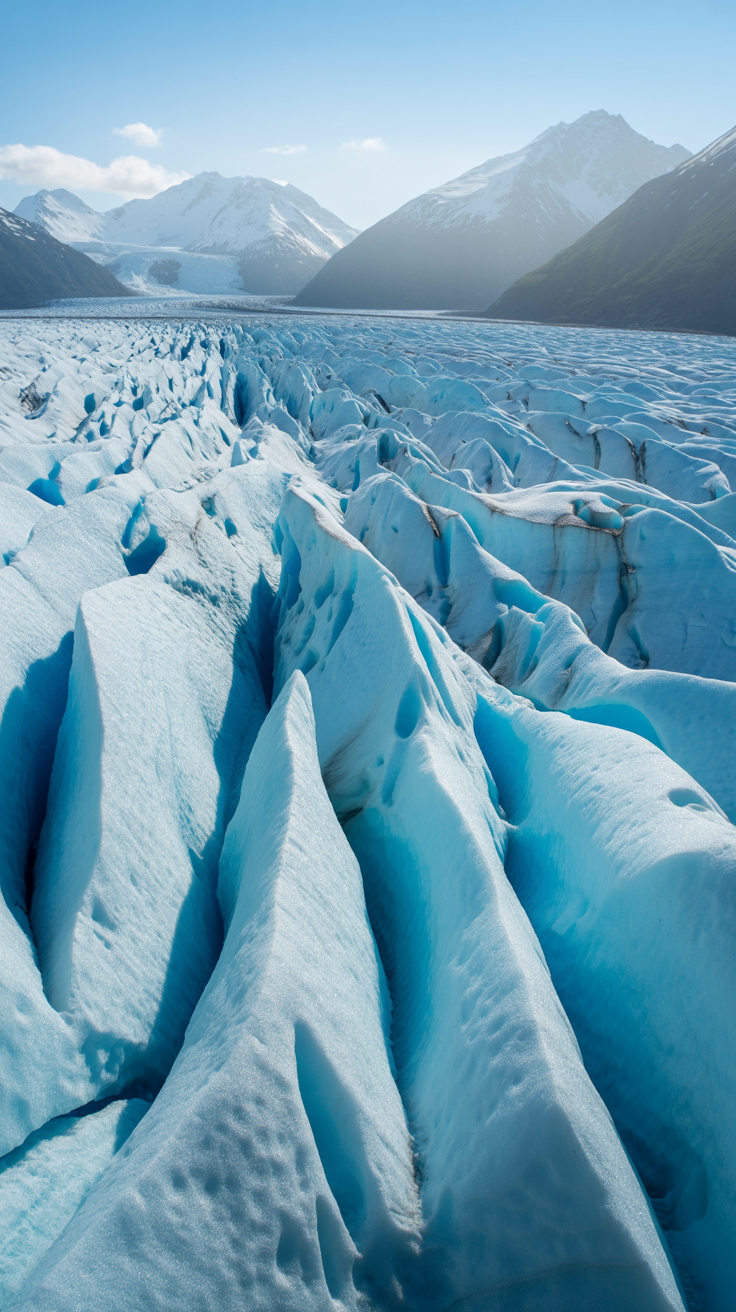
The brilliant white of glacial ice creates exposure challenges that confuse even sophisticated camera meters. Your camera sees all that white and tries to turn it into middle gray, resulting in dingy-looking ice. Overriding your exposure compensation to +1 stop counteracts this tendency and restores the brilliant whites and electric blues that make glacier photos spectacular.
- Shoot in RAW format for maximum editing flexibility with extreme bright and dark areas
- Use aperture priority mode (A or Av) with f/8 to f/11 for sharp foreground and background
- Keep ISO between 200-400 on bright days; the light reflects intensely off ice and water
- Enable continuous shooting mode to capture unexpected calving sequences
- Manual focus works better than autofocus when shooting through railings or windows
The Shutter Speed Secret
Even large cruise ships vibrate and sway more than your body registers. That gentle rocking translates to blurry photos at slower shutter speeds. Keeping your shutter at 1/500 second or faster eliminates motion blur from both ship movement and glacier action during viewing. If you’re zoomed in with a telephoto lens, push it even higher to 1/1000 second.
Positioning Strategy on Deck
Finding the right spot involves more than just claiming rail space. The crew usually announces which side offers optimal viewing, but smart photographers scout glacier viewing positions before the crowds arrive. Mid-ship locations provide the most stability, while forward positions offer dramatic approach angles as the glacier grows larger in your frame.
Height matters too. The higher decks provide expansive views and shoot over the heads of photographers below, but they also experience more ship movement. Lower decks offer stability and closer proximity to water-level icebergs and wildlife, though railings can obstruct views.
Timing Your Deck Arrival
Most passengers flood the decks during announced glacier viewing times, but the best light and least crowded conditions happen earlier. Arriving 30-45 minutes before the scheduled viewing gives you choice positioning and captures the anticipation as the glacier comes into view. The approach often rivals the main event for photographic interest.
Essential Gear and Accessories
Beyond your camera and lenses, specific accessories make the difference between frustration and photographic success:
- Polarizing filter: Reduces glare from water and ice while deepening blue tones in crevasses
- Microfiber lens cloths: Sea spray and condensation from temperature changes constantly threaten lens clarity
- Extra batteries: Cold temperatures drain batteries faster than you expect
- Memory cards with fast write speeds: Essential for capturing rapid-fire calving sequences
- Lens hood: Controls flare from bright reflections off ice and water
- Camera rain cover: Sudden rain or sea spray can soak equipment quickly
Leave your tripod in the cabin. Ships don’t allow them on crowded decks, and the constant movement makes them useless anyway. Instead, brace yourself against railings or solid structures for stability.
Capturing the Magic of Calving
The thunderous crash of ice breaking from a glacier face creates the most dramatic moments in Alaska cruising. These glacier experiences happen unpredictably, but certain signs increase your odds of witnessing one. Listen for creaking and groaning sounds. Watch for vertical cracks in the glacier face. Areas with active water flow often signal unstable ice.
When calving starts, resist the urge to immediately check your camera’s screen. Keep shooting in burst mode because calving events often happen in multiple stages. The initial collapse might trigger secondary falls, and the resulting waves create photographic opportunities as they reach floating icebergs.
Dealing with Common Challenges
Condensation plagues photographers moving between heated indoor spaces and cold decks. Your lens fogs instantly, ruining shots during critical moments. The solution involves either keeping your camera outside in a protected bag before shooting or allowing 10-15 minutes for temperature adjustment before the main event.
Reflections in windows complicate photography from enclosed decks. Pressing your lens hood against the glass minimizes reflections, or you can drape a dark jacket around your lens and the window. Better yet, brave the weather on open decks for unobstructed views.
Crowds create both physical and visual obstacles. Following photography best practices means being considerate while still getting your shots. Don’t monopolize prime spots, and be willing to take turns at the rail. Sometimes shooting through gaps in the crowd or incorporating other photographers into wide-angle environmental shots tells a more complete story anyway.
Beyond the Obvious Shot
Everyone photographs the glacier face, but unique photo opportunities exist in unexpected places:
- Icebergs floating in the foreground with glaciers behind create layered compositions
- Details of ice textures, patterns, and colors tell intimate stories
- Harbor seals resting on ice floes add wildlife interest to glacier scenes
- Ship elements like railings, rigging, or other passengers provide context and scale
- Reflections in calm water during early morning double the visual impact
- Birds riding icebergs or feeding in glacier outflow create action and life
Wide-angle lenses capture the massive scale and environment, while telephoto lenses isolate textures and patterns invisible to the naked eye. Both perspectives have value in documenting your cruise through Alaska’s best photo locations.
Weather and Lighting Considerations
Alaska weather changes rapidly and dramatically affects photography. Overcast days actually benefit glacier photography by providing even lighting without harsh shadows or blown-out highlights. The diffused light brings out subtle blue tones in ice that disappear under direct sun.
Rain creates its own mood and often yields dramatic skies with dark clouds contrasting against white ice. Don’t retreat indoors at the first raindrops. Some of the most memorable glacier images happen during weather transitions when light breaks through storm clouds.
Golden hour light transforms glaciers from white to warm pink and gold. Early morning approaches to glaciers or late afternoon departures bathe the ice in magical light that elevates ordinary compositions into extraordinary images.
Bonus Tips
- Charge all batteries overnight before glacier days; you’ll shoot far more than expected
- Bring hand warmers; cold hands struggle with camera controls during extended deck time
- Download offline maps showing glacier locations so you can anticipate approach angles
- Set your camera to back-button focus for faster response when action happens
- Bracket your exposures if uncertain; you can’t recreate these moments later
- Include the ship’s wake or bow in some shots to show movement and journey
- Photograph ice patterns on the water’s surface; they create abstract art
- Capture fellow passengers’ reactions for storytelling context
- Switch to black and white in editing to emphasize textures and shapes
- Use a wrist strap instead of a neck strap to prevent camera swing in wind
- Keep a plastic bag accessible for sudden rain or sea spray protection
- Notice how different focal lengths change the perceived size and drama of glaciers
Common Questions and FAQ
What if my camera only has automatic settings?
Modern smartphones and point-and-shoot cameras produce excellent glacier photos. Use your exposure compensation button (usually marked +/-) to brighten the image by one or two steps. Enable HDR mode to balance bright ice and darker water or sky. Tap on the glacier itself before shooting to tell your camera where to focus and expose.
Can I get good photos from inside the ship?
Absolutely, especially from observation lounges with large windows. The key is getting your lens right against the glass to minimize reflections. Indoor shooting protects your gear from weather and provides comfortable shooting conditions. The trade-off is glass distortion and potential reflections, but many successful glacier photographs happen from inside.
Do I need a special lens for wildlife near glaciers?
A telephoto zoom in the 70-300mm range handles both distant glacier details and nearby wildlife like seals, otters, and birds. If you can only bring one lens, a versatile 24-200mm or similar superzoom covers everything from wide environmental shots to wildlife closeups.
How do I avoid getting the same photo as everyone else?
Change your perspective by shooting at different times, using various focal lengths, or including unexpected foreground elements. Look for details rather than always shooting the entire glacier. Capture reflections, textures, patterns, or wildlife interactions that others miss while focused on the obvious vista. Arrive early or stay late when crowds thin.
Should I shoot in burst mode the entire time?
Save burst mode for anticipated action like calving events or wildlife behavior. Shooting continuously for hours fills memory cards with nearly identical images and drains batteries quickly. Instead, observe the scene and shoot deliberately until something dramatic happens, then switch to continuous shooting.
What’s the best way to compose glacier photos?
Follow the rule of thirds by placing the glacier face off-center rather than in the middle of your frame. Include foreground interest like icebergs or the ship itself to create depth. Show scale by including recognizable objects like boats or people. Vary your compositions between horizontal and vertical orientations to see which works better for each scene.
Personal Experience
Standing on the deck of our cruise ship as we approached Hubbard Glacier, I quickly learned that my usual photo settings weren’t going to cut it. The bright white ice kept tricking my camera’s meter, leaving my shots looking gray and dull. A photographer next to me suggested I overexpose by about +1 stop, and suddenly everything clicked – literally. The glaciers came alive in my viewfinder with that brilliant blue-white glow I’d been hoping for. She also mentioned shooting in RAW format, which saved me later when I realized I could recover so much more detail in the shadows and highlights than I ever could with JPEGs.
The timing part caught me off guard, though. Everyone rushes to the rails during the main glacier viewing, but some of my favorite shots came during the early morning approach when the light was softer and the decks weren’t packed with people. I found that positioning myself on the port side (that’s left, for fellow landlubbers) worked best for most of our glacier stops, though the crew usually announces the optimal viewing side beforehand. One trick that really helped was keeping my shutter speed at 1/500 or faster – the ship moves more than you think, and that subtle motion can ruin an otherwise perfect shot. Oh, and bring a polarizing filter if you have one. It cuts through the glare on the water and makes those ice blues pop in ways that editing can’t quite replicate.